Deciding to install photovoltaic panels on your home is one of the most consequential energy decisions you’ll make, and getting the process right from the start separates a system that pays for itself for decades from one that causes headaches from day one. This guide from Discount Solar walks through every stage of a residential solar installation, from assessing your roof to activating your system with the utility company. Below, we’ll show you exactly how to plan, permit, mount, wire, and commission a home solar system, including the mistakes most homeowners make and how to avoid them.
The photovoltaic (PV) installation process is more involved than most online guides suggest. Many homeowners assume it’s a weekend project. The reality is that a properly permitted, grid-tied home solar system typically takes several weeks from site visit to activation, and the electrical work requires precision that goes well beyond basic DIY skills.
What to Know Before You Install Photovoltaic Panels
Before a single panel goes on your roof, two decisions shape everything else: whether your roof can physically support a solar array, and what type of system you actually need.
Assessing Your Roof Suitability and Energy Needs
Roof suitability is the first filter in any photovoltaic installation. A south-facing roof pitch between 15 and 40 degrees captures the most sunlight in the northern hemisphere, but east and west orientations are workable with a slightly larger array. What disqualifies a roof outright is age, structural weakness, or excessive shading from trees and adjacent buildings.
Start by pulling 12 months of electricity bills to calculate your average monthly kilowatt-hour (kWh) consumption. That number determines system size. A home consuming 900 kWh per month in a high-sun region like Kern County, California, will need a meaningfully different array than the same home in a cloudier climate. Your roof’s available square footage then determines whether that system fits on one plane or needs to span multiple faces.
Watch Out
Never skip a structural engineer evaluation if your roof is older than 15 years or shows any signs of sagging. Mounting rails and a racking system add significant dead load. A roof failure after installation is catastrophic and may not be covered by standard homeowner’s insurance.
Grid-Tied vs. Off-Grid: Choosing Your System Type
The choice between grid-tied and off-grid defines your entire balance of system (BoS) design. Grid-tied systems connect to the utility grid, allow net metering credits for excess power generation, and do not require large solar battery banks. They are the most common residential configuration because they cost less upfront and eliminate the complexity of battery management.
Off-grid systems operate independently, which means solar batteries sized to cover multiple days of consumption become essential. They suit remote properties where grid connection is impractical. A third option, grid-tied with battery backup, is gaining traction as utility rates rise and grid reliability concerns grow. Understanding which configuration fits your energy needs before purchasing any equipment prevents expensive redesigns later.
Photovoltaic System Components You Need to Understand
A home solar system is not just panels on a roof. The balance of system components determine how efficiently your array produces usable electricity, and cutting corners on any of them creates problems that are expensive to fix.
Solar Panels, Inverters, and Solar Batteries
Solar panels are photovoltaic modules that convert sunlight into direct current (DC) electricity. Panel efficiency ratings typically range from around 17% to 23% for residential monocrystalline options, with higher efficiency panels producing more power per square foot.
Inverters handle DC/AC conversion, transforming the DC output of your panels into the alternating current (AC) your home appliances use. Two main inverter types dominate residential installations:
- String inverters connect all panels in series. They are cost-effective but underperform when any panel is shaded, since one weak panel pulls down the entire string’s output.
- Microinverters attach to each individual panel, optimizing output independently. They cost more but perform better on roofs with partial shading or multiple orientations.
Solar batteries store excess energy for use after dark or during outages. They are optional in grid-tied systems but become critical in off-grid or backup configurations.
Balance of System: Conduit, Disconnect Switch, and Grounding
The balance of system (BoS) covers everything outside the panels and inverters. This includes conduit runs carrying DC and AC wiring between components, a disconnect switch that allows utility workers to safely de-energize your system, and a grounding system that protects against electrical faults and lightning surges.
Proper grounding is the component most often underestimated by first-time installers. According to National Electrical Code guidelines from NFPA, all metallic components in a solar array, including mounting rails and panel frames, must be bonded to a continuous equipment grounding conductor. Skipping or improperly sizing this protection creates a serious shock and fire hazard.
Solar Panel Permits and HOA Regulations Explained
Solar panel permits are required in virtually every U.S. jurisdiction before installation begins, and submitting a complete permit package upfront dramatically reduces approval delays.
A typical permit package includes your system design drawings, panel and inverter specification sheets, a single-line electrical diagram, and a site plan showing panel placement. Many municipalities also require a structural letter from a licensed engineer confirming your roof can carry the array’s weight.
Permit timelines vary widely, from a few days in solar-friendly jurisdictions to several weeks in others. HOA regulations add another layer. The Solar Rights Act information from California’s CPUC limits HOAs’ ability to prohibit solar installations outright in California, though they can impose reasonable aesthetic requirements. Check your HOA’s specific covenants before finalizing panel placement, because relocating an array after installation to satisfy an HOA objection is expensive.
Pro Tip
Submit your permit application before ordering equipment. Lead times on panels and inverters can run four to eight weeks, and permits often arrive in a similar window, so running these timelines in parallel saves weeks off your overall project
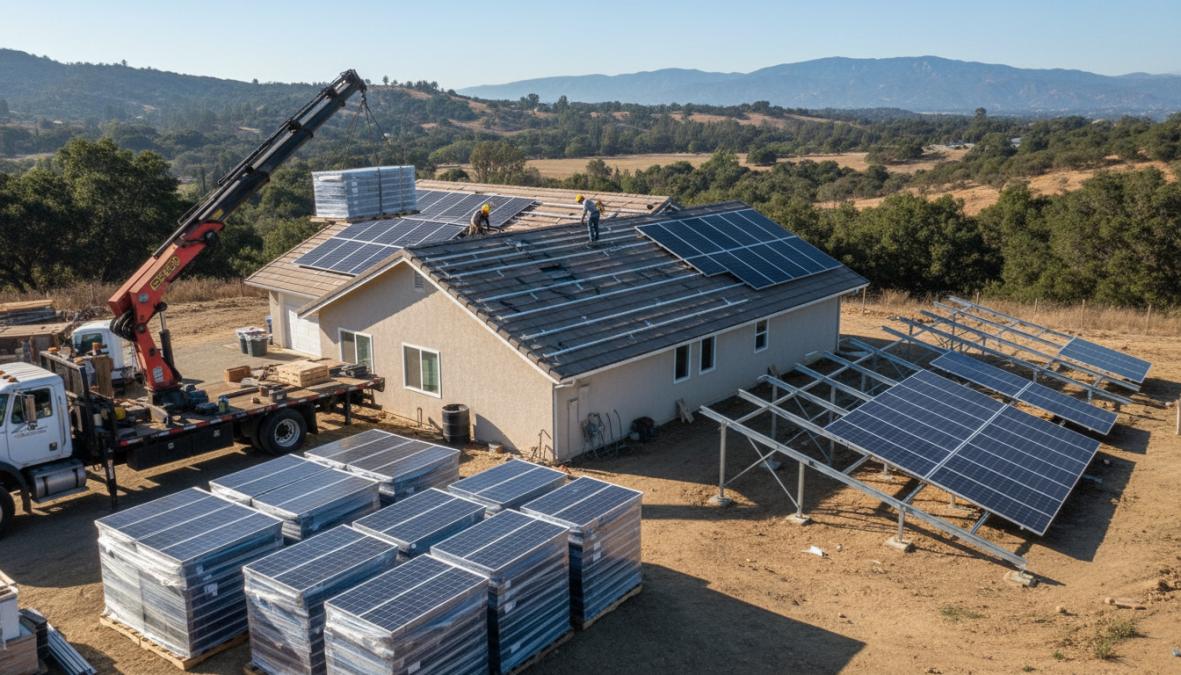
Solar Panel Mounting Systems: Roof Types and Ground Mounts
Mounting system selection is where the installation gets physical, and the wrong choice for your roof type creates leaks, structural stress, and voided warranties.
Comparing Racking Systems for Different Roof Types
| Roof Type | Recommended Racking | Key Consideration |
|---|---|---|
| Composition shingle | Flashed L-foot mounts | Seal every roof penetration with flashing and sealant |
| Standing seam metal | Clamp-on mounts | No roof penetrations required |
| Tile (concrete/clay) | Tile hook systems | Tiles must be lifted, not drilled |
| Flat roof | Ballasted tilt-up racking | Weight distribution across the deck |
| Ground mount | Driven or concrete pier posts | Requires trenching for conduit runs |
Composition shingle roofs are the most common and use flashed L-foot brackets that bolt through the sheathing into rafters. Every roof penetration must be sealed with roofing-grade sealant and covered with purpose-built flashing. Standing seam metal roofs are the installer’s preference because clamp-on attachments require zero penetrations, eliminating leak risk entirely.
Ground-mounted solar arrays offer more flexibility in orientation and tilt angle, and they are easier to maintain, but they require trenching conduit from the array to the main electrical panel and typically need a separate utility permit for the trench work.
Step-by-Step: How to Install Photovoltaic Panels on Your Home
The full process to install photovoltaic panels on a residential property follows a consistent sequence regardless of system size. Skipping or reordering these steps creates problems that are difficult and costly to unwind.
Total Time: 4-8 weeks (including permitting)
Difficulty: Advanced (electrical steps require licensed electrician in most jurisdictions)
What You’ll Need:
- Permit-approved system design drawings
- Solar panels, inverters, and mounting hardware
- Conduit, wire, connectors, and disconnect switch
- Safety harness, roof anchors, and non-slip footwear
- Torque wrench, drill, and wire stripper set
Step 1: Site Visit and System Design
A qualified installer or licensed engineer conducts a site visit to verify roof measurements, shading analysis, structural capacity, and the location of the main electrical panel. The system design produced from this visit becomes the basis for your permit application. Do not skip this step to save money. Designs built from satellite imagery alone regularly miss shading obstructions and structural issues that only appear in person.
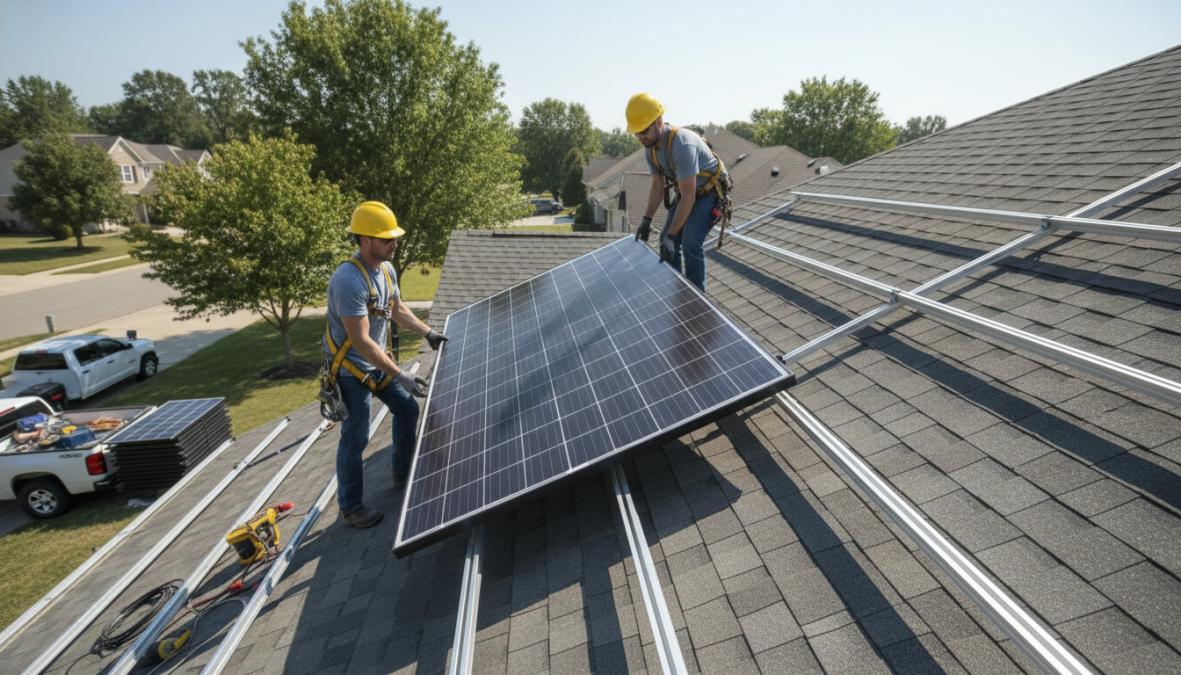
Step 2: Install Mounting Rails and Racking System
Once permits are approved, mark rafter locations on the roof using a stud finder, then drill pilot holes and install flashed L-foot brackets directly into rafters, not just sheathing. Apply roofing sealant under each flashing plate before fastening. Aluminum mounting rails then attach horizontally across the L-feet, creating the framework that holds the solar array. Check rail alignment with a level before torquing hardware to manufacturer specifications.
Step 3: Mount the Solar Array and Make Roof Penetrations
Panels attach to the rails using mid-clamps between adjacent panels and end-clamps at the array perimeter. Work from the bottom row up, keeping panels close to the roof surface to reduce wind loading. Each roof penetration for conduit must be sealed with a purpose-built roof boot and flashing, not just sealant alone.
Key Takeaway
Every roof penetration is a potential leak point. Use manufacturer-specified flashing hardware, not improvised solutions. Sealant alone fails within a few years under UV exposure and thermal cycling.
Step 4: Wire the Panels (Series and Parallel Configurations)
This is the step where most DIY installations go wrong. Panels wired in series add their voltages together while keeping current constant, which suits string inverters. Panels wired in parallel add their currents while keeping voltage constant, which is used to combine multiple strings or in some battery-based systems.
Your system design specifies the exact wiring configuration. Follow it precisely. Use UV-rated PV wire rated for outdoor exposure, and secure all wiring to the racking system with appropriate clips to prevent chafing against panel frames or roof surfaces. Label all conductors at both ends.
Step 5: Connect Inverters and Complete DC/AC Conversion Setup
String inverters mount in a shaded, ventilated location, typically on an exterior wall near the main panel. Run conduit from the array’s DC combiner or disconnect to the inverter, then from the inverter’s AC output to the main electrical panel. Install the DC disconnect switch between the array and the inverter, and the AC disconnect between the inverter and the panel, as required by code.
Microinverter installations differ: each microinverter mounts under its panel on the racking system, and AC wiring daisy-chains across the array before running a single conduit to the main panel. This simplifies the DC side but requires careful AC circuit sizing.
Step 6: Utility Inspection, Net Metering, and System Activation
A licensed electrician must sign off on the electrical work in most jurisdictions before the utility will schedule an inspection. The utility inspection confirms your disconnect switch, metering, and interconnection equipment meet their standards. Only after passing this inspection will the utility install a net metering-compatible meter and grant permission to operate (PTO).
Do not energize your system before receiving PTO in writing. Operating without utility approval can result in fines and forced disconnection.
Solar Panel Installation Cost and Financing Options
Solar panel installation cost varies based on system size, roof complexity, inverter type, and whether battery storage is included. Many homeowners are surprised to learn that the equipment itself represents only part of the total project cost; permitting, electrical work, and labor account for a significant portion.
Federal Tax Credits, Incentives, and Utility Rates
The federal Investment Tax Credit (ITC) currently allows homeowners to deduct a substantial percentage of their total solar installation cost from federal income taxes. State and local incentives layer on top of this. California offers additional programs through the CPUC, and many utilities in the state offer net metering programs that credit excess generation against future electricity bills, directly reducing the payback period.
According to U.S. Department of Energy’s Solar Energy Technologies Office, financing options for residential solar include cash purchase, solar loans, leases, and power purchase agreements (PPAs). Cash purchases and solar loans allow homeowners to capture the full value of the federal tax credit. Leases and PPAs transfer equipment ownership to the installer, which means the tax credit goes to the installer rather than the homeowner.
Pro Tip
Run the numbers on a solar loan before assuming a lease or PPA is more affordable. Homeowners who own their systems outright, even through financing, typically see significantly better long-term returns because they capture the tax credit and all net metering credits directly.
Common Mistakes to Avoid and Post-Installation Maintenance
The most expensive mistakes in photovoltaic panel installation happen before a single panel is mounted. Here are the ones that show up repeatedly:
Common installation mistakes:
- Skipping a structural assessment and discovering roof damage mid-installation
- Under-sizing conduit, making future system expansions impossible without re-running wire
- Improperly torquing mounting hardware, leading to panel movement in high winds
- Wiring panels in the wrong configuration for the chosen inverter type
- Failing to label conductors, which creates serious hazards for future service technicians
Post-installation, a home solar system requires relatively little maintenance, but ignoring it entirely costs money over time. Clean panels twice a year in dusty climates like Kern County, where particulate buildup measurably reduces output. Monitor your system’s production data through the inverter’s monitoring portal monthly. A sudden drop in output is almost always traceable to a specific cause: shading from new tree growth, a failed microinverter, or a loose connection.
Annual visual inspections of the racking system, conduit connections, and roof penetration seals catch problems before they escalate. Most quality racking systems and panels carry 25-year warranties, but warranty claims require documented maintenance records.
When to Hire Qualified Installers Instead of Going DIY
Here’s a direct answer most guides avoid: the electrical interconnection work in a grid-tied photovoltaic system should be performed by a licensed electrician in virtually every case. This is not a liability hedge. It reflects the actual complexity and risk involved.
Many jurisdictions require a licensed electrician’s signature on permit applications for the AC interconnection work regardless of who installs the panels and racking. Utilities often require proof of licensed electrical work before granting permission to operate. Attempting to circumvent this adds project risk without meaningful cost savings.
DIY installation is most viable for the mechanical portions: racking assembly, panel mounting, and conduit rough-in. The electrical terminations, disconnect switch installation, and main panel interconnection are where professional involvement pays for itself in safety, code compliance, and warranty protection.
Discount Solar’s team of certified installers has handled both straightforward and complex custom solar designs across Bakersfield and Kern County for over a decade. With a 25-year equipment warranty backing every installation, the difference between a DIY attempt and a professionally installed system shows up most clearly when a warranty claim or utility issue arises years later. Get your estimate from Discount Solar and see exactly what your home qualifies for.
Frequently Asked Questions
1. How long does it take to install a photovoltaic system?
The physical installation of a home solar system typically takes one to three days for a qualified installer or experienced DIYer. However, the full process, including site visit, system design, pulling solar panel permits, utility approval, and net metering activation, can take several weeks to a few months depending on your local permitting office and utility company’s timeline. Planning ahead and working with a solar company familiar with your region can significantly speed things up.
2. What permits are needed to install a photovoltaic system?
Most jurisdictions require a building permit, an electrical permit, and utility interconnection approval before you can install photovoltaic panels. Your local building department reviews the system design, structural load calculations, and electrical plans. In California, including Kern County, you may also need to comply with HOA regulations and submit documentation for net metering. Always check with your local authority having jurisdiction (AHJ) before beginning any installation work to avoid costly delays or code violations.
3. Which components are required for a PV installation?
A complete photovoltaic system includes solar panels (the PV array), inverters for DC/AC conversion (string inverters or microinverters), a racking and mounting rail system, solar batteries if you want energy storage, a disconnect switch, conduit, grounding hardware, and all balance of system (BoS) wiring. Grid-tied systems also require a utility meter and net metering agreement. Off-grid setups rely more heavily on solar batteries and a solar generator for backup power when sunlight is limited.
4. Is it expensive to install photovoltaic panels?
Solar panel installation cost varies based on system size, roof complexity, component choices, and local labor rates. In California, costs can range widely, but federal tax credits and state incentives can offset a significant portion of the upfront price. Flexible financing options, including solar loans and leases, make it possible to start generating clean energy with little or no money down. Over time, reduced electricity bills and net metering credits typically make a home solar system a strong long-term investment.
5. Can photovoltaic panels be installed on the ground?
Yes, ground-mounted solar arrays are a practical alternative when roof suitability is limited due to shading, structural concerns, or orientation issues. Ground mounts use a dedicated racking system anchored into the soil or concrete, and can often be angled more precisely for optimal power generation. They do require more land area and additional conduit runs to connect to your home’s electrical system, but they make it easier for a qualified electrician to access panels for maintenance and cleaning.
6. What is the best direction and angle to install solar panels?
In the Northern Hemisphere, including Bakersfield and Kern County, CA, solar panels generate the most kilowatt-hours (kWh) when facing true south at a tilt angle roughly equal to your latitude, around 35 degrees for most of Central California. East- or west-facing installations still produce meaningful energy and may better match household usage patterns. During your site visit, a solar company will evaluate shading, roof pitch, and local sun hours to optimize your system design for maximum power generation year-round.


